Monday to Saturday - 9:00 am -18:00 pm
Understanding Your Honda’s Charging System Warning
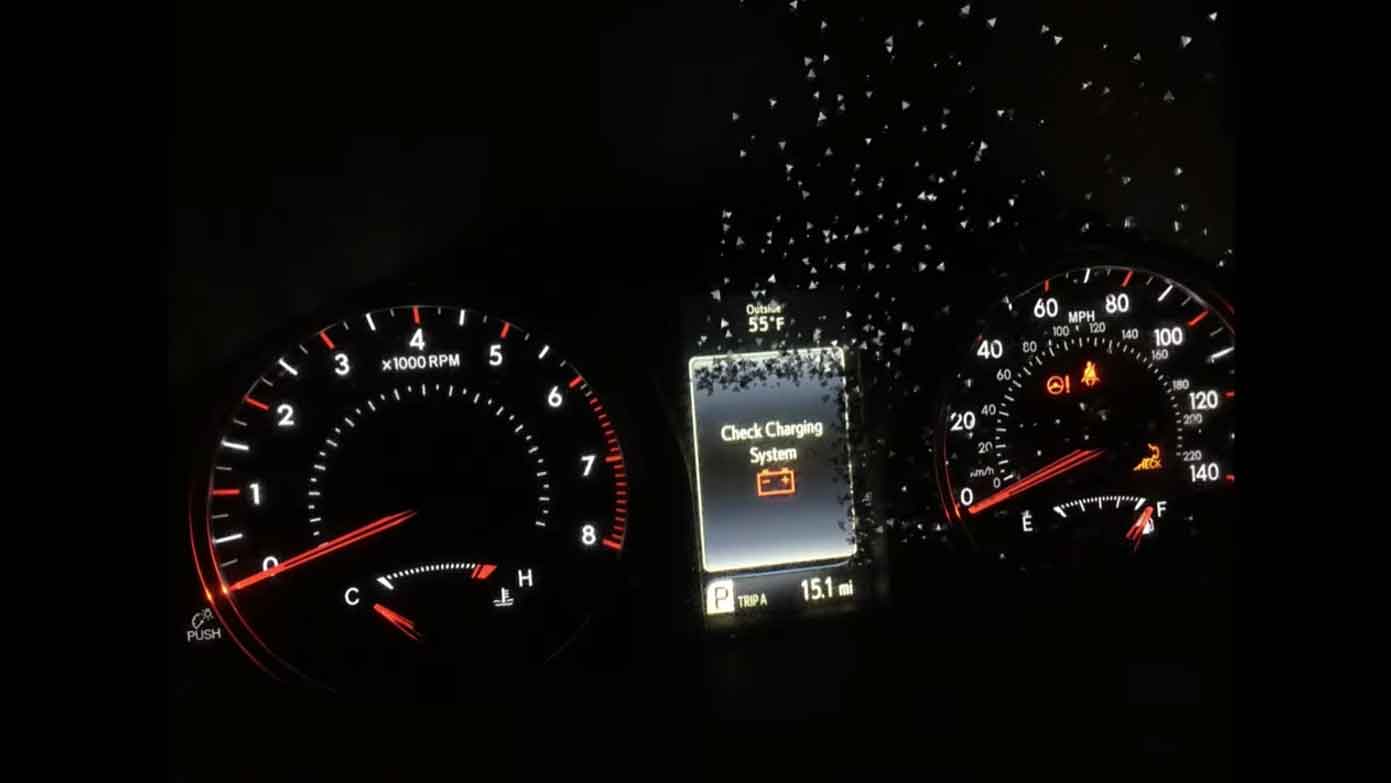
Your Honda’s dashboard just lit up with a “Check Charge System” warning. Your heart skips a beat. I get it—I’ve seen this panic on customers’ faces hundreds of times in my shop.
This warning means your car’s electrical system isn’t working right. Something is stopping your battery from charging properly. Don’t ignore it. I’ve seen drivers strand themselves because they thought it would go away on its own.
The charging system keeps your battery full while you drive. It powers everything—your headlights, radio, air conditioning, and engine computer. When it fails, you’re running on battery power alone. That won’t last long.
What Does the Check Charge System Alert Mean?
This alert is your Honda’s way of screaming for help. The car’s computer detected a problem with how electricity flows through your vehicle.
In my 15 years under the hood, I’ve learned this warning points to three main culprits. Your alternator might be dying. Your battery could be toast. Or your electrical connections are corroded and loose.
Your alternator is like a power plant for your car. It converts engine power into electricity. When you’re driving, it recharges the battery and runs all your electrical stuff. If it breaks, your battery drains fast.
The warning light usually comes with other symptoms. Your headlights might dim when idling. Your radio could cut out. The engine might hesitate or stall. These are red flags I watch for when diagnosing charging issues.
Common Causes of Honda Charging System Problems
Failing Alternator
The alternator is the number one reason I see this warning. These units typically last 80,000 to 150,000 miles. But they can fail sooner in hot climates or with lots of short trips.
When I service a car like this, I hear a whining or grinding noise from the alternator. The bearings inside wear out. The voltage regulator stops controlling power output correctly. Sometimes the diodes burn out.
Your Honda might show 12 volts on the battery when the engine is off. But when running, it should read 13.5 to 14.5 volts. Anything less means your alternator isn’t charging.
Dead or Weak Battery
Batteries don’t last forever. Most die after 3 to 5 years. Extreme heat kills them faster than cold.
I test every battery that comes into my shop with a load tester. This tool shows me if the battery can hold voltage under pressure. A bad battery might read 12 volts sitting still but drops to 9 volts when you start the car.
Corroded battery terminals cause problems too. That white or blue crusty stuff blocks electrical flow. I clean terminals on almost every third car I see. It’s that common.
Damaged Serpentine Belt
The serpentine belt spins your alternator. If it’s cracked, glazed, or loose, the alternator can’t generate power.
From years under the hood, I can spot a bad belt in seconds. Look for cracks on the ribbed side. Feel for a glazed, shiny surface. Check for fraying edges. A squealing noise when you start the engine screams “bad belt.”
I’ve seen belts snap while customers were driving. The charging system dies instantly. So does your power steering and air conditioning. Not fun on a hot day in traffic.
Corroded or Loose Connections
Electrical connections get dirty and loose over time. Road salt, moisture, and vibration all take their toll.
The main connections I check are at the battery terminals, alternator, and ground straps. A loose ground strap is sneaky. Everything might work fine until you hit a bump. Then the connection breaks and your warning light comes on.
I use a wire brush and terminal cleaner to scrub connections clean. Then I apply dielectric grease to prevent future corrosion. This simple maintenance prevents so many problems.
Faulty Voltage Regulator
The voltage regulator controls how much power your alternator produces. Too much voltage fries electrical components. Too little voltage drains your battery.
Many Honda alternators have the voltage regulator built inside. When it fails, you need a whole new alternator. Testing requires a multimeter and some know-how.
I’ve diagnosed voltage regulators that overcharge at 16 volts. This boils battery acid and destroys electronics. Others undercharge at 12 volts, leaving you with a dead battery.
Symptoms That Appear With This Warning
Dimming Headlights and Interior Lights
When your charging system struggles, lights dim first. They need steady power to shine bright.
Watch your headlights when sitting at a red light. If they brighten when you rev the engine, your alternator is weak. In my shop, this test takes 30 seconds and tells me volumes.
Dashboard lights might flicker too. The radio display could fade in and out. These symptoms mean you’re running on battery power without proper charging.
Dashboard Warning Lights
The battery light often appears alongside the check charge system alert. Some Hondas show both. Others display just one.
I’ve seen the ABS light and traction control light come on too. Low voltage confuses these systems. They shut down to protect themselves.
Your check engine light might illuminate. The computer stores trouble codes related to charging voltage. I scan these codes with my diagnostic tool to pinpoint problems.
Difficulty Starting the Engine
A weak charging system leaves your battery partially charged. Starting the engine becomes harder each time.
You might hear slow cranking when you turn the key. The starter motor labors to spin the engine. Or you get nothing but clicks—a classic sign of a dead battery.
Jump-starting works temporarily. But if the alternator isn’t charging, you’ll be stuck again within miles. I’ve towed too many Hondas that limped along after a jump start.
Electrical Accessories Acting Strange
Your power windows might move slowly. The radio could shut off randomly. The air conditioning might blow weak.
Modern cars run dozens of computers and sensors. They all need stable voltage. When power fluctuates, strange things happen. I’ve diagnosed cars where the fuel pump failed due to low voltage.
The clock might reset. Your radio presets could disappear. These are signs your car lost power completely at some point.
Strange Noises From Engine Bay
A failing alternator makes noise. Listen for whining, grinding, or squealing sounds.
The bearings inside alternators wear out and grind. The belt might squeal if it’s loose or glazed. I put my ear near the alternator while the engine runs to identify bad bearings.
A clicking sound could mean a loose belt slapping around. Or electrical arcing inside a failing alternator. These noises tell me exactly what’s broken.
How to Diagnose the Problem Yourself
Visual Inspection Steps
Pop your hood and look around. You don’t need fancy tools for this basic check.
First, inspect the serpentine belt. Look for cracks, fraying, or glazing. Press on the belt between pulleys. It should have about a half-inch of give. Too loose means it’s slipping.
Check your battery terminals. Look for corrosion—that white or greenish crusty buildup. Wiggle the terminal connections. They shouldn’t move at all.
Examine the alternator for oil leaks. Oil damages the alternator’s internal parts. Look at all visible wiring for cuts, burns, or loose connections.
Testing Battery Voltage
Grab a digital multimeter. They cost $20 and every car owner should have one.
Set the multimeter to DC voltage. Touch the red probe to the positive battery terminal. Touch the black probe to the negative terminal.
With the engine off, you should see 12.4 to 12.8 volts. Anything below 12.4 means your battery is discharged. Below 12 volts and it’s dead.
Now start the engine. The voltage should jump to 13.5 to 14.5 volts. This proves your alternator is charging. If it stays at 12 volts or less, your alternator has failed.
Rev the engine to 2,000 RPM. Watch the voltage reading. It should stay steady between 13.5 and 14.5 volts. Voltage that bounces around or climbs above 15 volts means a bad voltage regulator.
Checking Alternator Output
Turn on everything electrical—headlights, AC, radio, rear defrost. This loads down the charging system.
Watch your multimeter while these accessories run. The voltage should stay above 13.5 volts. If it drops below 13 volts, your alternator can’t handle the load.
In my shop, I use a carbon pile load tester for more accurate results. But the multimeter test works great for DIY diagnosis.
Listen to the alternator while the engine runs. Bad bearings make grinding or whining sounds. A loose pulley might rattle. These noises confirm it needs replacement.
Inspecting Belt Condition and Tension
A bad belt is easy to spot. Run your hand along the ribbed side. Feel for cracks, missing chunks, or smoothness.
The belt should feel slightly rough on the ribbed side. A glazed, shiny surface means it’s slipping and needs replacement.
Check tension by pressing the belt between pulleys. You should be able to push it down about half an inch. More than that and it’s too loose. No give at all and it’s too tight.
Look at the belt tensioner pulley. It should sit in the middle of its range. If it’s maxed out, the belt has stretched too much and needs replacement.
Professional Diagnostic Approach
When customers bring me a Honda with this warning, I follow a systematic process.
First, I connect my scan tool to read trouble codes. Honda stores specific codes for charging system problems. Code P0562 means low system voltage. Code P0563 means high voltage. These codes guide my diagnosis.
I test the battery with a load tester. This machine pulls 200+ amps from the battery while measuring voltage. A good battery maintains 9.6 volts or higher under this load for 15 seconds.
Next, I check alternator output with a specialized tester. This tool measures amps, voltage, and AC ripple. High AC ripple indicates bad diodes inside the alternator.
I inspect all electrical connections with a voltage drop test. This finds hidden resistance in wiring and grounds. Even a small voltage drop causes big problems.
Finally, I test all fuses and fusible links. A blown main fuse can shut down the entire charging system.
Step-by-Step Fix for Check Charge System Warning
Replacing a Faulty Alternator
This is the most common repair I perform for this warning.
First, disconnect the negative battery cable. This prevents electrical shorts while working.
Loosen the serpentine belt tensioner and remove the belt. Label and disconnect all wires from the alternator. Some have a plug connector. Others have a nut securing the main power wire.
Remove the alternator mounting bolts. On most Hondas, there are two or three bolts. The alternator slides out from the top or bottom depending on the model.
Install the new alternator in reverse order. Make sure all connections are tight. The power wire nut should be snug—I torque it to 10-12 ft-lbs.
Reinstall the belt and check tension. Start the engine and test charging voltage with your multimeter. It should read 13.5 to 14.5 volts.
I always use OEM or quality aftermarket alternators. Cheap rebuilt units fail within months. Trust me, I’ve learned this the hard way.
Installing a New Battery
If your battery failed the load test, replacement is necessary.
Disconnect the negative cable first, then the positive. Remove any hold-down bracket securing the battery.
Lift out the old battery. These weigh 30-40 pounds, so use proper lifting technique.
Clean the battery tray and cable terminals with a wire brush and baking soda solution. This removes acid and corrosion.
Place the new battery in the tray. Make sure it sits flat and secure. Install the hold-down bracket.
Connect the positive cable first, then the negative. Tighten the terminal bolts until snug. Don’t overtighten—you can crack the battery post.
Apply anti-corrosion spray or dielectric grease to the terminals. This prevents future corrosion.
Changing the Serpentine Belt
A worn belt needs replacement before it breaks.
Locate the belt routing diagram under your hood. Take a photo with your phone for reference.
Use a wrench on the belt tensioner pulley. Rotate it to release tension and slide the belt off.
Route the new belt following the diagram. Make sure it sits properly in all pulley grooves.
Release the tensioner to apply pressure to the new belt. Double-check that the belt runs in all the correct grooves.
Start the engine and listen for squealing. A proper installation runs quiet.
I replace the belt tensioner if it’s weak or the pulley bearing is rough. A bad tensioner won’t keep proper belt pressure.
Cleaning Battery Terminals and Connections
This simple maintenance prevents many charging problems.
Disconnect both battery cables. Mix baking soda and water into a paste.
Apply the paste to corroded terminals and cable ends. The mixture fizzes as it neutralizes battery acid.
Scrub everything with a wire brush or battery terminal cleaner tool. Get into the cable ends too—corrosion hides inside.
Rinse with clean water and dry thoroughly. Reconnect the cables—positive first, then negative.
Coat the terminals with dielectric grease or anti-corrosion spray. This protective layer stops future corrosion.
In coastal areas or snowy regions with road salt, I recommend cleaning terminals every six months.
Preventive Maintenance Tips
Regular Battery Maintenance
Check your battery every three months. Look for corrosion, cracks, or leaks.
Keep terminals clean and tight. A loose connection causes voltage drops and poor charging.
Most batteries have a sticker showing the install date. Replace your battery every four to five years, even if it seems fine. Don’t wait for failure.
I’ve tested batteries that looked perfect but failed under load. Age degrades the plates inside. Preventive replacement saves you from getting stranded.
Serpentine Belt Inspection Schedule
Inspect your belt every oil change. Look for cracks, fraying, or glazing.
Most belts last 60,000 to 100,000 miles. But I’ve seen them fail at 40,000 miles in hot climates.
Replace the belt if you see more than three cracks per inch. Don’t wait for it to break.
Check the belt tensioner too. A weak tensioner lets the belt slip even when new.
Keeping Electrical Connections Clean
Spray electrical connections with contact cleaner once a year. This removes dirt and oxidation.
Check ground strap connections. These thick cables connect the engine to the chassis. They corrode and loosen over time.
Wiggle all major electrical connectors to find loose connections. Fix any that move or feel sloppy.
Protect cleaned connections with dielectric grease. This prevents moisture intrusion.
Annual Charging System Test
Have your charging system tested once a year. Most auto parts stores do this free.
The test takes five minutes and checks battery, alternator, and starter. It catches problems before they leave you stranded.
I recommend testing before summer and winter. Extreme temperatures stress electrical systems.
This proactive approach saves money. A $150 alternator is cheaper than a tow truck and emergency repair.
Cost Estimates for Common Repairs
Alternator Replacement Costs
A new alternator for a Honda costs $150 to $400 for the part. OEM alternators run $300-400. Quality aftermarket units cost $150-250.
Labor adds $100 to $200 depending on your location and the model. Some Hondas have easy alternator access. Others require removing multiple components.
Total cost runs $250 to $600 for alternator replacement. I charge $350-450 for most Honda models in my shop.
Battery Replacement Costs
A quality battery costs $100 to $200. Cheap batteries might be $80, but they don’t last.
I recommend batteries with at least a 3-year free replacement warranty. Many come with 5-year warranties.
Installation is usually free at parts stores if you buy the battery there. Shops charge $20-40 for installation.
Total cost is $100 to $240 for a new battery installed.
Belt Replacement Costs
A serpentine belt costs $20 to $50 for quality brands. OEM belts run $40-60.
Labor is typically $50 to $100. The job takes 30 minutes to an hour depending on access.
Total cost runs $70 to $150 for belt replacement.
If you need a new tensioner too, add $50-100 for the part and extra labor.
DIY vs Professional Repair
Replacing a battery is easy DIY work. You need basic hand tools and 15 minutes.
Changing a serpentine belt is moderate difficulty. You need to access the tensioner and route the belt correctly.
Alternator replacement is more complex. It requires electrical knowledge and proper torque specs. I recommend professional help unless you’re experienced.
DIY saves labor costs but requires time and tools. Professional repair includes warranty and expertise.
In my experience, customers who tackle repairs beyond their skill level often create bigger problems. Know your limits.
When to Seek Professional Help Immediately
Warning Persists After Basic Fixes
You cleaned terminals and replaced the battery, but the warning stays on. This means a deeper electrical problem exists.
I’ve diagnosed cars with corroded wiring harnesses inside the insulation. You can’t see this damage from outside.
Computer failures can also trigger this warning. The PCM (powertrain control module) monitors charging voltage. If it malfunctions, you get false warnings.
Don’t keep throwing parts at the problem. Professional diagnosis with proper scan tools finds hidden issues.
Multiple Electrical Problems Appearing
When several electrical systems fail together, you have a major problem.
I’ve seen corroded fusible links cut power to multiple circuits. One bad connection affects everything downstream.
Wiring harness damage from rodents causes bizarre symptoms. Mice chew through wires creating shorts and opens.
Water intrusion into connectors wreaks havoc. Corrosion spreads through the electrical system over time.
These problems require systematic diagnosis with wiring diagrams and proper tools. This is professional territory.
Smoke or Burning Smell
Stop driving immediately if you smell burning or see smoke. This indicates an electrical short or fire risk.
I’ve seen alternators catch fire from internal shorts. Wiring harnesses can melt and burn from overheating.
A shorted battery can release explosive hydrogen gas. Sparks near the battery create serious danger.
Have your car towed to a shop. Don’t risk driving with electrical fire hazards.
Complete Electrical Failure While Driving
Your entire electrical system dies while driving. No lights, no power, nothing. This is dangerous and needs immediate professional attention.
A catastrophic alternator failure or broken main fusible link causes this. Your battery drained instantly when the alternator died.
Don’t try to limp the car home. You’ll lose power steering and brakes. Modern cars need electricity to run safely.
Call for a tow truck. This level of failure requires professional diagnosis and repair.
Honda Model-Specific Considerations
Common Issues in Honda Accord
I see charging problems often in 2008-2012 Accords. The alternator fails around 100,000 miles in these models.
The 2013-2017 Accords have issues with battery sensor modules. This small computer monitors battery health. When it fails, you get false warnings.
V6 Accords have tighter engine bays. Alternator replacement takes longer and costs more due to difficult access.
Honda Civic Charging System Notes
Older Civics (2006-2011) commonly have battery terminal corrosion. The terminals aren’t sealed well and corrode quickly.
The 2012-2015 Civics have a recall for alternator failures. Check if your car has this recall outstanding.
Civic hybrid models use a different charging system. They have a DC-DC converter instead of a traditional alternator. These units cost $800-1200 to replace.
CR-V and Pilot Specific Problems
CR-Vs and Pilots have larger alternators due to more electrical demands. These units cost more—$250-450 for the part.
I’ve replaced many alternators in 2007-2011 CR-Vs around 80,000 miles. It’s a known weak point.
Pilots with factory roof racks sometimes have corroded ground connections where the rack mounts. This creates charging problems that seem mysterious until you find the bad ground.
Odyssey Minivan Concerns
Odysseys have lots of electrical accessories—sliding doors, entertainment systems, multiple power outlets. This stresses the charging system.
The alternators work harder and wear faster. I see failures around 70,000-90,000 miles.
The battery location under the floor behind the driver’s seat makes replacement more difficult. Labor costs run higher.
Frequently Asked Questions
Can I Drive With the Check Charge System Warning On?
You can drive short distances, but I don’t recommend it. Your battery will drain quickly without proper charging.
You might make it home or to a repair shop if it’s close. But you risk getting stranded anywhere.
I’ve seen customers ignore the warning and drain their battery completely. Then they need a jump start and a tow. Don’t be that person.
The safe choice is to diagnose and fix the problem immediately.
How Long Does an Alternator Last?
Most Honda alternators last 80,000 to 150,000 miles. Some make it to 200,000 miles with proper maintenance.
Hot climates reduce alternator life. Heat degrades internal components faster.
Lots of short trips stress alternators too. The unit works hard to recharge the battery but never reaches optimal operating temperature.
Stop-and-go city driving wears alternators faster than highway cruising.
Will a Bad Alternator Damage My Battery?
Yes, a failing alternator damages your battery. Undercharging leaves your battery in a constant discharged state. This sulfates the plates inside.
Overcharging is worse. Too much voltage boils the battery acid. This warps internal plates and can crack the battery case.
I always test batteries after alternator replacement. Often the battery is damaged and needs replacement too.
Replace both together if your alternator killed your battery. Don’t put a new alternator on a damaged battery.
Can a Bad Battery Cause the Charging System Warning?
Absolutely. A battery with a shorted cell pulls too much current. The alternator can’t keep up.
The computer sees low voltage and triggers the warning. But the real problem is the battery, not the alternator.
This is why I always test the battery first. It’s cheaper to replace and might solve the problem.
Replacing an alternator when you just needed a battery wastes money. Proper diagnosis prevents this.
What Happens if I Ignore This Warning?
Your battery dies and your car stops running. Usually at the worst possible time and place.
You’ll need a jump start or tow. Repeated deep discharges ruin your battery permanently.
You might damage other electrical components. Low voltage makes computers malfunction and can fry sensitive electronics.
Worst case, a failing alternator catches fire or causes a wiring harness meltdown. I’ve seen both happen.
Fix the problem now and avoid expensive consequences later.
Conclusion and Final Recommendations
The check charge system warning demands immediate attention. Don’t ignore it and hope it goes away.
Start with simple checks—clean your battery terminals, inspect your serpentine belt, test battery voltage. These DIY steps solve many problems.
If basic maintenance doesn’t fix it, get professional diagnosis. Guessing wastes money on wrong parts.
In my shop, I see too many DIY repairs gone wrong. Customers replace alternators when they needed batteries. Or they ignore obvious problems until major damage occurs.
Invest in preventive maintenance. Test your charging system annually. Replace your battery every four years. Inspect your belt regularly.
These simple steps prevent most charging system failures. You’ll save money and avoid getting stranded.
Your Honda is reliable, but it needs basic care. Give it attention and it’ll give you years of trouble-free driving.
If you’re unsure about any repair, ask a professional. A small diagnostic fee beats expensive mistakes. Trust me—I fix those mistakes every week.
Keep your charging system healthy and your Honda will keep you moving down the road.